Hugo+github搭建个人博客(windows10)
一个尽可能详细的在windows平台上hugo+github部署个人博客的教程。一方面为了记录自己建立博客时候的过程和遇到的困难,另一方面为了给那些学习建立个人博客的同学提供参考。
在参照本教程的时候可以和B站up主CodeSheep的视频搭配食用。
链接地址:手把手教你从0开始搭建自己的个人博客 |第二种姿势 | hugo
准备工作
一定要了解git和github(不了解也可以,跟着步骤走,慢慢熟悉)- Github账户(存放博客网页的静态文件)
- LeanCloud账户(评论系统,视个人情况选择是否添加评论系统)
- 安装hugo和git
- 安装vs code(用于部署过程中编辑各种文本,windows自带的记事本真的不行)
安装Git
git的安装非常简单,和平时安装程序一样,全部选项默认就好,一般不会遇到什么问题和困难,在此不再详细介绍,参见Git安装教程
安装hugo
windows10下安装hugo,可以参照Hugo官方手册的方法,这里讲一个相对简单稳定的方法。
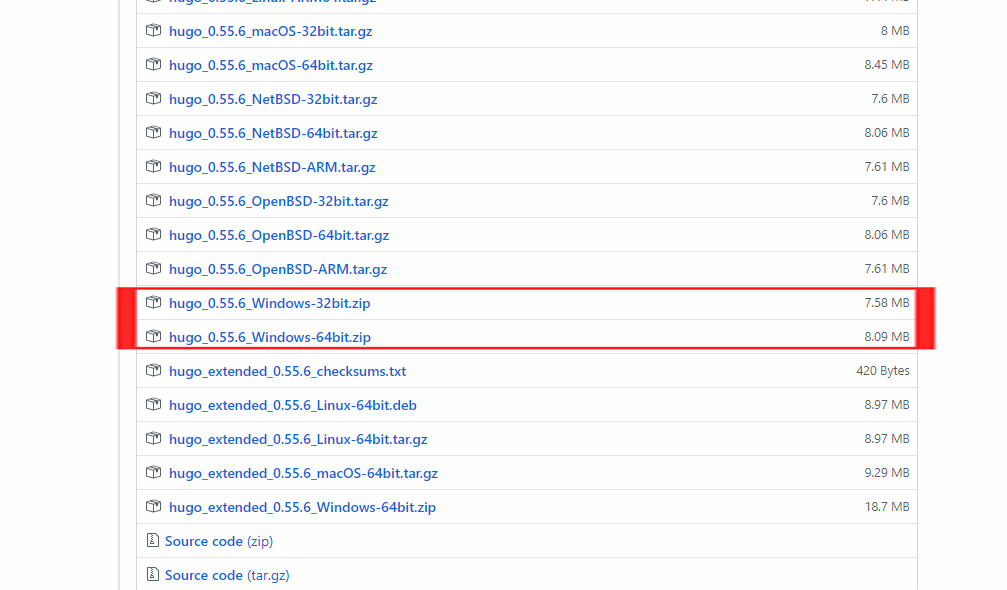
1. 下载hugo程序压缩包:前往hugo发布页面下载和自己系统版本相符合的hugo程序压缩包。(使用的版本不同,则命令上有略有差异,可以详细阅读发行说明以了解区别,这里使用的是0.57.2及以下版本)
2. 解压到某个文件夹中(路径不要有中文,而且自己要记得文件夹的路径),最好是不常改动的文件夹下边,以防文件被误删或者丢失。
3. 添加hugo到系统环境变量PATH中
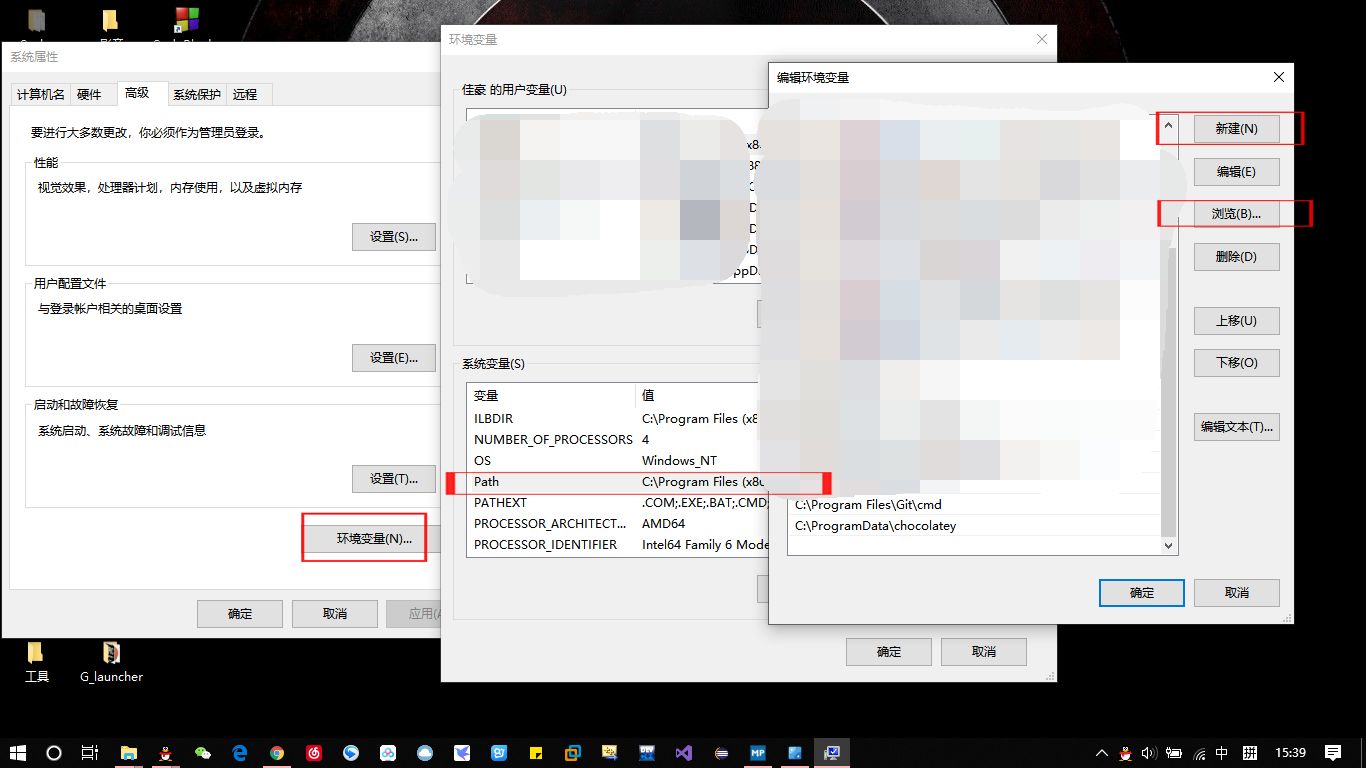
a. 找到“系统环境变量”的设置位置,在开始菜单的搜索栏搜索环境变量
b. 添加系统环境变量,依此:点击环境变量,找到系统变量中的path,点击编辑,然后点击新建,在使用浏览按钮选中文件夹,即可使用hugo。(选中到hugo.exe所在的文件夹即可,不需要选中hugo.exe)
4. 接下来,为了万无一失,还是要检查一下hugo是否安装完成。以管理员方式打开cmd命令窗口,然后输入以下指令:
hugo version如果得到如下响应,(即显示版本信息),说明安装成功,接下来就可以玩转hugo了。
Hugo Static Site Generator v0.55.6-A5D4C82D windows/amd64 BuildDate: 2019-05-18T07:57:00Z创建并配置站点
以下所有的“XXXX”均为占位符,你可以替换为属于你自己的文件名
创建站点命令
使用cmd命令手册中的CD命令,选择一个文件夹,在其中存放站点的相关文件,文件路径不要有中文。
hugo new site XXXX该命令执行后,便会在你选择的文件夹下生成名为“XXXX”的文件夹,我们在此称这个文件夹为站点文件的“根目录”。
下载并配置站点主题(以tranquilpeak主题为例)
下载主题
你可以在Hugo的主题库中选择你喜欢的主题,这里以tranquilpeak主题作为教程示例。
可以使用修改hosts文件的方法来解决github链接不上或者clone操作慢的问题,或者将主题的仓库导入到coding或者gitee的仓库中,然后再从转存后的仓库clone也可以,点击打包下载整个仓库也可以。
在根目录下使用CD命令来到themes文件夹下,并且在tranquilpeak主题下很容易找到clone命令如下:
cd themes
git clone https://github.com/kakawait/hugo-tranquilpeak-theme.git tranquilpeak

#以下为注释说明,可以在clone的整句命令后加上你要clone到的文件夹名字,默认是hugo-tranquilpeak-theme
#可是默认的文件夹名称实在是太长了,为了方便使用,可以在命令后边加上空格然后指定为一个短点儿的文件夹名字,比如这里的tranquilpeak
配置主题
将 根目录\themes\tranquilpeak\exampleSite路径下的config.toml文件复制到根目录下,覆盖掉根目录下的config.toml文件。然后,我们在vscode中打开并对其作一定的修改就可以直接使用,具体可以修改的内容如下(以我自己的站点配置文件为例,不建议直接复制,我也不清楚格式会不会影响,我会尽可能注释我知道的配置项的含义):
# 写在最前面的说明,这些带号的都属于注释,但是作者把某些可自定义的内容,注释掉了,我们也可自己改过来

baseURL = "https://SAquarius.github.io/"
# 这个是站点最终部署之后的链接地址,如果要部署在github上则直接修改为github的仓库地址,或者在build的时候用命令指定baseurl
# 如果要自定义域名,那么这里可以直接用自定义域名也是可以的,当自定义域名配置好以后才能看出来效果

languageCode = "en-us"
defaultContentLanguage = "zh-cn"
# 这个是语言设置,这样子就是中文啦!

title = "SAquarius的梦想屋"
# 站点的名字,可以自己随便写

theme = "tranquilpeak"
# 所使用的主题,即主题的文件夹名字,如果有多个主题想轮换使用,改这个就行,或者在build的时候使用-t指令指定主题也可以

disqusShortname = "valine"
# 这个是评论系统,我才用的是在leancloud上的valine评论系统
# 如果是第一次用hugo搭建博客,这个可以暂时不用管
# 因为leancloud需要实名资料认证,可能需要些时间才能审核通过
# 等到熟悉的使用hugo和配置文件以及git后再来添加评论系统也不迟

# 每一页显示的文章数量
paginate = 6

# 这个我也忘记是什么了,就按他默认的true吧
canonifyurls = true

# 这个是使用hugo命令后产生的静态文件的输出目录,大家都是用的public,作者的好像是docs
# 就很迷,很多教程没提到这一点,我一直以为自己的没产生public
# 其实,也可以在生成的时候使用hugo -D public 指定输出目录
# 建议还是改成public,这样很多教程都用这个,省的看了不一样的教程,搞迷糊了
publishDir = "public"

# 这个应该是时间格式,不用改
[permalinks]
  post = "/:year/:month/:slug/"

# 这一项保持默认
[taxonomies]
  tag = "tags"
  category = "categories"
  archive = "archives"

# 关于站点作者的相关信息
[author]
  name = "SAquarius"

  # 生涯记录,或者经历,我直接写了一条格言
  bio = "All in or nothing, now or never!"
  job = "学生"
  location = "武汉"
  # Your profile picture
  # Overwritten by your gravatar image if `author.gravatarEmail` is filled
  # 作者直接用的WordPress的头像,填写,一个邮箱就可以直接拉取账号的头像
  # 因为需要梯子访问WordPress所以我删去了邮箱的那一项,直接使用文件路径,
  # 直接在tranquilpeak/static/images文件夹里放上头像图片就行了,比如放一个touxiang.png
  picture = "/images/touxiang.png"

  # 下边这些Twitter还有google的就省了吧,后边关于这些的分享选项我也一并删掉了
  # Your Twitter username without the @. E.g : thibaudlepretre
  # twitter = "thibaudlepretre"
  # Your google plus profile id. E.g : +ThibaudLepretre or 114625208755123718311
  # googlePlus = "+ThibaudLepretre"

# Menu Configuration
# 侧边栏菜单配置,可以改成自定义的内容,其实只用改identifier和name就可以了
[[menu.main]]
  weight = 1
  identifier = "首页"
  name = "首页"
  pre = "<i class=\"sidebar-button-icon fa fa-lg fa-home\"></i>"
  url = "/"
[[menu.main]]
  weight = 2
  identifier = "类别"
  name = "类别"
  pre = "<i class=\"sidebar-button-icon fa fa-lg fa-bookmark\"></i>"
  url = "/categories"
[[menu.main]]
  weight = 3
  identifier = "标签"
  name = "标签"
  pre = "<i class=\"sidebar-button-icon fa fa-lg fa-tags\"></i>"
  url = "/tags"
[[menu.main]]
  weight = 4
  identifier = "归档"
  name = "归档"
  pre = "<i class=\"sidebar-button-icon fa fa-lg fa-archive\"></i>"
  url = "/archives"
[[menu.main]]
  weight = 5
  identifier = "关于"
  name = "关于"
  pre = "<i class=\"sidebar-button-icon fa fa-lg fa-question\"></i>"
  url = "/#about"

[[menu.links]]
  weight = 1
  identifier = "github"
  name = "GitHub"
  pre = "<i class=\"sidebar-button-icon fa fa-lg fa-github\"></i>"
  url = "https://github.com/SAquarius"
  #github的链接,改为自己的Github链接就行了
[[menu.misc]]
  weight = 1
  identifier = "rss"
  name = "RSS"
  pre = "<i class=\"sidebar-button-icon fa fa-lg fa-rss\"></i>"
  url = "/index.xml"

#一些辅助功能的参数设置
[params]
  # Customize date format use to render blog post date, categories and other
  # You must use date format used by Go Time package https://golang.org/pkg/time/
  # Months (not work with short month like "jan", "feb", etc) are translated if translation exists on i18n folders
  # Default format is: January 2, 2006
  # dateFormat = "2 January 2006"

  # Global keywords configuration. Following keywords will be add to every pages
  # 站点的全局关键字,应该是给搜索引擎参考用的吧,可以自己修改添加,用逗号隔开就行
  keywords = ["C", "C++","PAT"]

  # Syntax highlighter, possible choice between: "highlight.js" (recommanded) and "prism.js" (experimental)
  # You can comment it to disable syntax highlighting
  # 代码高亮,有两种可以选,哪个好看选哪个,我直接默认了
  syntaxHighlighter = "highlight.js"

  # Hide sidebar on all article page to let article take full width to improve reading, and enjoy wide images and cover images. (true: enable, false: disable)
  # 清爽阅读,就是看文章的时候把侧边栏缩进去
  clearReading = true

  # Define categories will create hierarchy between parents: `categories = ["foo", "bar"]` will consider "bar" a sub-category of "foo".
  # If false it will flat categories.
  # 和分类与标签有关,直接默认就是了
  hierarchicalCategories = true

  # 站点的描述
  description = "SAquarius的梦想屋"

  # Customization
  # Define the behavior of the sidebar
  # 1: Display extra large sidebar on extra large screen, large sidebar on large screen,
  #    medium sidebar on medium screen and header bar on small screen and
  # extra large sidebar is swiped on extra large screen and large sidebar on all lower screen (default)
  # 2: Display large sidebar on large screen, medium sidebar on medium screen and
  #    header bar on small screen and large sidebar is swiped
  # 3: Display medium sidebar on large and medium screen and header bar on small screen and
  #    medium sidebar is swiped
  # 4: Display header bar on all screens, extra large sidebar is swiped on extra large screen and
  #    large sidebar is swiped on all lower screens
  # 5: Display header bar on all screens and large sidebar is swiped on large screen
  # 6: Display header bar on all screens and medium sidebar is swiped
  # 这个是侧边栏的模式,1-6代表不同的宽度之类的,2看起来很好看,自己每个都试试就知道效果了,或者直接看上边的英文介绍
  sidebarBehavior = 2

  # Your blog cover picture. I STRONGLY recommend you to use a CDN to speed up loading of pages.
  # There is many free CDN like Cloudinary or you can also use indirectly
  # by using services like Google Photos.
  # Current image is on AWS S3 and delivered by AWS CloudFront.
  # Otherwise put your image in folder `static/_images/` (development)  or in `source/assets/images/` if you can't or don't want to build the theme,
  # and use relative url : `your-image.png`
  # 这个是站点的封面,放在和头像一样的文件夹下,自定义一些图片吧,属于自己的自定义肯定看着舒服
  coverImage = "images/cover.jpg"

  # Display an image gallery at the end of a post which have photos variables (false: disabled, true: enabled)
  #照片墙,或者叫图片走廊,用于默认缩略图或者文章封面的功能,前提是你得存放照片
  imageGallery = true

  # Display thumbnail image of each post on index pages (false: disabled, true: enabled)
  # 文章缩略图功能
  thumbnailImage = true

  # Display thumbnail image at the right of title in index pages (`right`, `left` or `bottom`)
  # Set this value to `right` if you have old posts to keep the old style on them
  # and define `thumbnailImagePosition` on a post to overwrite this setting
  # 缩略图的位置,默认为bottom,即在下边,可以选top,left或者right,这是默认的,也可以在文章里重新定义
  thumbnailImagePosition = "bottom"

  # Automatically select the cover image or the first photo from the gallery of a post if there is no thumbnail image as the thumbnail image
  # Set this value to `true` if you have old posts that use the cover image or the first photo as the thumbnail image
  # and set `autoThumbnailImage` to `false` on a post to overwrite this setting
  # 自动缩略图,就是从照片墙中选一张用作缩略图,直接默认吧
  autoThumbnailImage = true

  # Your favicon path, default is "/favicon.png"
  # 很好玩的功能,就是访问时,浏览器标签页那里显示的站点图标,有兴趣可以自己做一个,存放路径应该和头像一样吧,自己试一试,我没使用,就保持注释掉的状态
  # favicon = "/favicon.png"

  # Header configuration
  # The link at the right of the header is customizable
  # You can add a link (as an icon) at the right of the header instead of the author's gravatar image or author's picture.
  # By default, author's gravatar or author's picture is displayed.
  #     url: /#search
  #     icon: search
  #     class: st-search-show-outputs

  # Display `Next` on left side of the pagination, and `Prev` on right side one.
  # If you set this value to `true`, these positions swap.
  # 一个很反人类习惯的设定,默认作者是注释掉了,一定要开启并且改为true
  # 默认是下一篇按钮在左,上一篇按钮在右,开了就调换过来,符合国人的习惯,可能是外国人使用习惯不一样吧
  # 或者直接在主题语言包翻译那里直接改翻译的选项也可以
  swapPaginator = true

  # Custom CSS. Put here your custom CSS files. They are loaded after the theme CSS;
  # they have to be referred from static root. Example
  # [[params.customCSS]]
  #   href = "css/mystyle.css"

  # Custom JS. Put here your custom JS files. They are loaded after the theme JS;
  # they have to be referred from static root. Example
  #自定义js插件,这里采用一个很好看的点击鼠标出现爱心的特效
  #将在这个主题的目录下static/js中新建文件clicklove.js
  #然后将下边给出的插件代码复制进去,就可以了
   [[params.customJS]]
     src = "js/clicklove.js"
  #新年到了加个雪花吧!类似于点击爱心特效,在同样的文件夹下创建snow.js然后将下文中雪花的代码复制进去就可以了
   [[params.customJS]]
     src = "js/snow.js"

  # Sharing options
  # Comment and uncomment to enable or disable sharing options
  # If you wanna add a sharing option, read user documentation :
  # Tranquilpeak configuration > Theme configuration > sharing-options

  #这个地方应该我删掉了sharing options,也就是分享链接的设置,有兴趣的可以研究一下加上微信之类的分享

  # 点击about时候的行为,展示个人信息,不用改,默认就行
  [params.header.rightLink]
    class = ""
    icon = ""
    url = "/#about"

  # 如果添加了valine的评论系统,就需要加上这一段代码,否则不用管;
  # 占位符在后边会讲到怎么填
  [params.valine]
    enable = true
    appId = 'XXXXXXXXXXXXXXXXXXXXXXXXXXXXXXXXX'
    appKey = 'XXXXXXXXXXXXXXXXXXXXXXXX'
    notify = false
    vertify = false
    avatar = 'mp'
    placeholder = '说点什么吧'
    visitor = true

  # Customize link of author avatar in sidebar
  # [params.sidebar.profile]
  #   url = "/#about"

  # Customize copyright value "© 2017 <CUSTOMIZATION>. All Rights Reserved"
  # [params.footer]
  #   copyright = "<a href=\"https://github.com/kakawait\">kakawait</a>"
在主题配置中加入自定义的js插件以后,添加的点击爱心特效插件的代码如下:
(function(window,document,undefined){
    var hearts = [];

    window.requestAnimationFrame = (function(){
        return window.requestAnimationFrame ||
        window.webkitRequestAnimationFrame ||
        window.mozRequestAnimationFrame ||
         window.oRequestAnimationFrame ||
         window.msRequestAnimationFrame ||
         function (callback){
             setTimeout(callback,1000/60);
         }
    })();

    init();

    function init(){
        css(".heart{width: 10px;height: 10px;position: fixed;background: #f00;transform: rotate(45deg);-webkit-transform: rotate(45deg);-moz-transform: rotate(45deg);}.heart:after,.heart:before{content: '';width: inherit;height: inherit;background: inherit;border-radius: 50%;-webkit-border-radius: 50%;-moz-border-radius: 50%;position: absolute;}.heart:after{top: -5px;}.heart:before{left: -5px;}");
        attachEvent();
        gameloop();
    }

    function gameloop(){
        for(var i=0;i<hearts.length;i++){
            if(hearts[i].alpha <=0){
                document.body.removeChild(hearts[i].el);
                hearts.splice(i,1);
                continue;
             }

             hearts[i].y--;
             hearts[i].scale += 0.004;
             hearts[i].alpha -= 0.013;
             hearts[i].el.style.cssText = "left:"+hearts[i].x+"px;top:"+hearts[i].y+"px;opacity:"+hearts[i].alpha+";transform:scale("+hearts[i].scale+","+hearts[i].scale+") rotate(45deg);background:"+hearts[i].color;
        }

        requestAnimationFrame(gameloop);
    }

    function attachEvent(){
        var old = typeof window.onclick==="function" && window.onclick;
        window.onclick = function(event){
            old && old();
            createHeart(event);
        }
    }

    function createHeart(event){
        var d = document.createElement("div");
        d.className = "heart";
        hearts.push({
            el : d,
            x : event.clientX - 5,
            y : event.clientY - 5,
            scale : 1,
            alpha : 1,
            color : randomColor()
        });

        document.body.appendChild(d);
    }

    function css(css){
        var style = document.createElement("style");
        style.type="text/css";
        try{
            style.appendChild(document.createTextNode(css));
        }
        catch(ex){
            style.styleSheet.cssText = css;
        }

        document.getElementsByTagName('head')[0].appendChild(style);
    }

    function randomColor(){
        return "rgb("+(~~(Math.random()*255))+","+(~~(Math.random()*255))+","+(~~(Math.random()*255))+")";
    }

})(window,document);
雪花的插件代码如下:
(function($){
$.fn.snow = function(options){
var $flake = $('<div id="snowbox" />').css({'position': 'absolute','z-index':'9999', 'top': '-50px'}).html('❄'),
documentHeight = $(document).height(),
documentWidth = $(document).width(),
defaults = {
minSize : 10,
maxSize : 20,
newOn : 1000,
flakeColor : "#AFDAEF" /* 此处可以定义雪花颜色,若要白色可以改为#FFFFFF */
},
options = $.extend({}, defaults, options);
var interval= setInterval( function(){
var startPositionLeft = Math.random() * documentWidth - 100,
startOpacity = 0.5 + Math.random(),
sizeFlake = options.minSize + Math.random() * options.maxSize,
endPositionTop = documentHeight - 200,
endPositionLeft = startPositionLeft - 500 + Math.random() * 500,
durationFall = documentHeight * 10 + Math.random() * 5000;
$flake.clone().appendTo('body').css({
left: startPositionLeft,
opacity: startOpacity,
'font-size': sizeFlake,
color: options.flakeColor
}).animate({
top: endPositionTop,
left: endPositionLeft,
opacity: 0.2
},durationFall,'linear',function(){
$(this).remove()
});
}, options.newOn);
};
})(jQuery);
$(function(){
$.fn.snow({
minSize: 5, /* 定义雪花最小尺寸 */
maxSize: 50,/* 定义雪花最大尺寸 */
newOn: 300 /* 定义密集程度,数字越小越密集 */
});
});再来加点樱花吧:相类似的使用下边的代码创建一个自定义的js文件,然后添加即可。(js文件中的图片资源链接可以任意修改,这样飘什么都可以随意定制了)
var stop, staticx;
var img = new Image();
img.src = "https://pic.songjiahao.com/img/cherry.png";
function Sakura(x, y, s, r, fn) {
  this.x = x;
  this.y = y;
  this.s = s;
  this.r = r;
  this.fn = fn;
}
Sakura.prototype.draw = function (cxt) {
  cxt.save();
  var xc = (30 * this.s) / 4;
  cxt.translate(this.x, this.y);
  cxt.rotate(this.r);
  cxt.drawImage(img, 0, 0, 25 * this.s, 25 * this.s);
  cxt.restore();
};
Sakura.prototype.update = function () {
  this.x = this.fn.x(this.x, this.y);
  this.y = this.fn.y(this.y, this.y);
  this.r = this.fn.r(this.r);
  if (
    this.x > window.innerWidth ||
    this.x < 0 ||
    this.y > window.innerHeight ||
    this.y < 0
  ) {
    this.r = getRandom("fnr");
    if (Math.random() > 0.4) {
      this.x = getRandom("x");
      this.y = 0;
      this.s = getRandom("s");
      this.r = getRandom("r");
    } else {
      this.x = window.innerWidth;
      this.y = getRandom("y");
      this.s = getRandom("s");
      this.r = getRandom("r");
    }
  }
};
SakuraList = function () {
  this.list = [];
};
SakuraList.prototype.push = function (sakura) {
  this.list.push(sakura);
};
SakuraList.prototype.update = function () {
  for (var i = 0, len = this.list.length; i < len; i++) {
    this.list[i].update();
  }
};
SakuraList.prototype.draw = function (cxt) {
  for (var i = 0, len = this.list.length; i < len; i++) {
    this.list[i].draw(cxt);
  }
};
SakuraList.prototype.get = function (i) {
  return this.list[i];
};
SakuraList.prototype.size = function () {
  return this.list.length;
};
function getRandom(option) {
  var ret, random;
  switch (option) {
    case "x":
      ret = Math.random() * window.innerWidth;
      break;
    case "y":
      ret = Math.random() * window.innerHeight;
      break;
    case "s":
      ret = Math.random();
      break;
    case "r":
      ret = Math.random() * 6;
      break;
    case "fnx":
      random = -0.5 + Math.random() * 1;
      ret = function (x, y) {
        return x + 0.2 * random - 1.7;
      };
      break;
    case "fny":
      random = 1.5 + Math.random() * 0.7;
      ret = function (x, y) {
        return y + random;
      };
      break;
    case "fnr":
      random = Math.random() * 0.03;
      ret = function (r) {
        return r + random;
      };
      break;
  }
  return ret;
}
function startSakura() {
  requestAnimationFrame =
    window.requestAnimationFrame ||
    window.mozRequestAnimationFrame ||
    window.webkitRequestAnimationFrame ||
    window.msRequestAnimationFrame ||
    window.oRequestAnimationFrame;
  var canvas = document.createElement("canvas"),
    cxt;
  staticx = true;
  canvas.height = window.innerHeight;
  canvas.width = window.innerWidth;
  canvas.setAttribute(
    "style",
    "position: fixed;left: 0;top: 0;pointer-events: none;"
  );
  canvas.setAttribute("id", "canvas_sakura");
  document.getElementsByTagName("body")[0].appendChild(canvas);
  cxt = canvas.getContext("2d");
  var sakuraList = new SakuraList();
  for (var i = 0; i < 25; i++) {
    var sakura, randomX, randomY, randomS, randomR, randomFnx, randomFny;
    randomX = getRandom("x");
    randomY = getRandom("y");
    randomR = getRandom("r");
    randomS = getRandom("s");
    randomFnx = getRandom("fnx");
    randomFny = getRandom("fny");
    randomFnR = getRandom("fnr");
    sakura = new Sakura(randomX, randomY, randomS, randomR, {
      x: randomFnx,
      y: randomFny,
      r: randomFnR,
    });
    sakura.draw(cxt);
    sakuraList.push(sakura);
  }
  stop = requestAnimationFrame(function () {
    cxt.clearRect(0, 0, canvas.width, canvas.height);
    sakuraList.update();
    sakuraList.draw(cxt);
    stop = requestAnimationFrame(arguments.callee);
  });
}
window.onresize = function () {
  var canvasSnow = document.getElementById("canvas_snow");
};
img.onload = function () {
  startSakura();
};
function stopp() {
  if (staticx) {
    var child = document.getElementById("canvas_sakura");
    child.parentNode.removeChild(child);
    window.cancelAnimationFrame(stop);
    staticx = false;
  } else {
    startSakura();
  }
}
设置文章模板
为了更好的使用附加功能,比如封面和缩略图,我们提前修改一下模板。这样,每次使用新建一篇文档时候就省去很多麻烦事。
使用MarkDown编辑工具打开themes/tranquilpeak/archetypes中的post.md直接替换为以下的模板:
---
title: "{{ replace .TranslationBaseName "-" " " | title }}"
date: {{ .Date }}
categories:
- category
- subcategory
tags:
- tag1
- tag2
keywords:
- tech
# 使用时请删去这些解释的注释
# 缩略图,最好采用宽度为750的图片,可以使用本地文件或者使用git图床
# 使用本地图库,请把图片存在themes/static/images文件夹下,并且用下面的路径引用
thumbnailImage: /images/cover.jpg
# 缩略图位置,我觉得放在上面好看,如果用的小图片作缩略图
# 可以放在(left或者right),设置此项会取代配置文件中默认在下边的设置
thumbnailImagePosition: top
# 这个下边默认就好了,暂时不清楚有什么影响
autoThumbnailImage: yes
metaAlignment: center
# 封面图片,如果选用本地文件的话,和缩略图同样的路径,21:9的图片效果很好看
coverImage: /images/cover.jpg
# 封面图片的描述引号中的文字可以自己选
coverCaption: "文章cover图片描述"
# in表示文章标题显示在封面图片上,out表示显示在封面图片的外边,也就是文章开头
coverMeta: in
# 封面图片的覆盖大小,直接默认为full吧,21:9的图片这样设置显示效果真的不错
coverSize: full
---
#缩略显示的梗概,这里把注释删去,写成文章的简介或者梗概,在首页时候可以只显示梗概
<!--more-->
<!-- toc -->
接下来在根目录下使用以下命令生成一篇文档吧(不同版本或者主题命令可能不同,比如有的是使用posts作为md文档的路径):
hugo new post/XXXX.md 待本地启动后,可以继续修改这篇文档的内容,在需要的文件夹中加入需要的图片,然后调整相关的参数,看看图片的几个功能是否正常或者符合预期。
更多的配置参数可以阅读tranquilpeak主题的使用文档
启动博客的本地预览
建议在配置文件中设置好主题,或者使用 --t指令指定主题,在站点的根目录下使用命令进行本地启动,本地启动的命令如下:
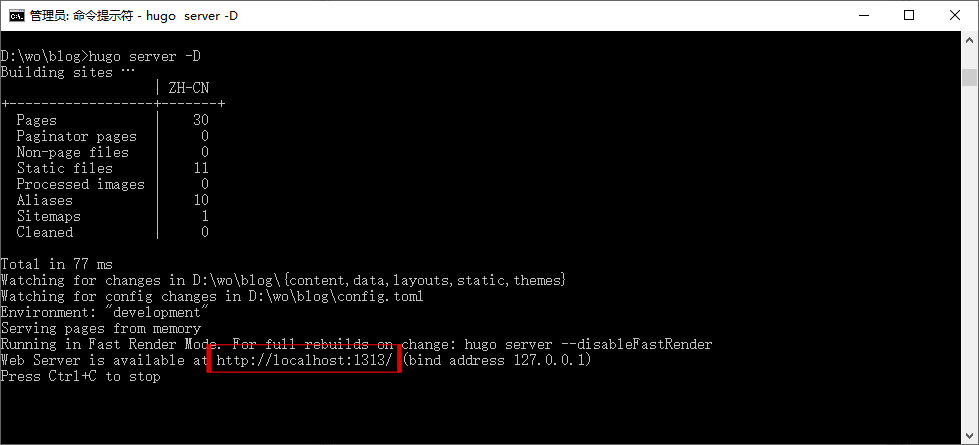
hugo server -D 如果执行顺利,会有如下提示:

在浏览器中输入图片红框中的地址进行预览效果,比如一般是localhost:1313。
添加评论功能valine
添加教程部分参见smslit博客。
由于LeanCloud更新了服务规则,国内节点现在域名需要备案过才能使用。所以建议把评论后台部署在LeanCloud的国际账户上。
修改主题文件的步骤上有所不同,这个主题中只需要修改themes/tranquilpeak/layouts/_default/single.html文件,将以下代码插入到第36行的位置:
{{- if .Site.Params.valine.enable -}}
              <!-- id 将作为查询条件 -->
              <span id="{{ .URL | relURL }}" class="leancloud_visitors" data-flag-title="{{ .Title }}">
                <span class="post-meta-item-text">文章阅读量 </span>
                <span class="leancloud-visitors-count">1000000</span>
                <p></p>
              </span>
              <div id="vcomments"></div>
              <script src="https://cdn.jsdelivr.net/npm/jquery/dist/jquery.min.js"></script>
              <script src='//unpkg.com/valine/dist/Valine.min.js'></script>
              <script type="text/javascript">
                new Valine({
                  el: '#vcomments' ,
                  appId: '{{ .Site.Params.valine.appId }}',
                  appKey: '{{ .Site.Params.valine.appKey }}',
                  notify: '{{ .Site.Params.valine.notify }}',
                  verify: '{{ .Site.Params.valine.verify }}',
                  avatar:'{{ .Site.Params.valine.avatar }}',
                  placeholder: '{{ .Site.Params.valine.placeholder }}',
                  visitor: '{{ .Site.Params.valine.visitor }}'
                });
              </script>
              {{- end }}
这样,如果leancloud审核通过建立了应用的话,评论系统就可以使用了。当然啦,也可以本地启动一下,测试一下评论系统,如果没有问题就可以上传到远端仓库并部署了。
建立Github仓库并使用page服务部署博客
建立Github仓库
注册Github账户,并且建立一个Repository,方法可以参见视频中的介绍,这个过程一般不会遇到什么问题。
生成静态文件
接下来是生成静态文件,这里要把配置文件config.toml中的baseUrl修改为自己的将来的部署地址,对于Github中的page服务使用的地址为https://XXXXXXXX.github.io/ 或者在hugo命令中使用指令指定 --baseUrl=“https://XXXXXXXX.github.io/”
如果在配文件中已经设置好baseUrl和themes的路径,以及输出文件夹,可以直接在站点根目录下采用以下命令:
hugo成功后会按照设置好的路径生成一个public文件夹(有的主题默认生成doc文件夹),接下来我们需要将public文件夹中的内容提交到Github的仓库中去。
设置全局用户名和邮箱
使用以下命令配置全局用户名和邮箱,用于识别身份(XXXX是占位符,换成自己的github名字和邮箱):
git config --global user.name "xxxxx"
git config --global user.email "xxxxx@xx.com"
将本地仓库文件部署到GitHub
然后进入public文件中依此使用以下命令部署到Github上:
#进入public文件夹
cd public
#初始化
git init
#添加public中的所有文件
git add .
#提交描述,XXXX中是你这次提交的描述,可以随便写
git commit -m "XXXXXXXX"
#链接到远端,把XXXX替换成自己的内容,不要忘了还有后缀.git
git remote add origin https://github.com/XXXXX/XXXXX.github.io.git

git pull origin main
git push -u origin main
这个过程一般不会有什么问题发生,第一次提交应该会要求输入Gihub的账号和密码验证,我使用的时候是直接弹窗的形式出现的,验证过后,之后的push就不用账号密码了。
如果在学习测试阶段遇到push报错,可以在采用暴力一点的方式,加入-f指令,不是采用合并的方式而是删除仓库中以前的所有记录,将本地仓库强制push到远端,所以慎用。但是在初学阶段,随便折腾吧,大不了从新再来,如果之后在此push还遇到问题,去google搜索解决吧。加入-f的push指令如下:
git push -u origin main -fGithub原来默认主分支为master,现在默认主分支为main,注意区别
后续更新内容
后续再写文章的时候,直接在站点根目录下新建一篇文档就行了(如果像前边介绍的配置了生成模板的话会很方便使用的):
hugo new post/XXXXX.md如果对配置不做大的改动(例如:更换主题等),后续的push过程很简单的啦,只有下面几个了(根目录下使用命令):
hugo
cd public
git add .
git commit -m "XXXXXXX"
git pull origin main
git push origin main
这样似乎很麻烦,其实可以写一个脚本简化push过程的,有兴趣的可以研究下,但是新手还是多用用git的命令吧。push之前最好本地启动预览一下,如果没有问题再push吧!
关于Git
Git教程
Git实在是太好玩了,如果想要深入的了解和学习Git的话,推荐廖雪峰的Git教程讲的很好,很适合新手,可以跟着教程新建一个仓库练练手。
PICGO与Git图床
站点中的图片可以直接使用站点的本地文件夹,也可以使用Git图床的方式引入图片,PicGO+Gitee搭建自己图床的教程已经写好,可以参考教程动手首先。
成果展示
这里是——>我的blog,我买了一个属于自己的域名,把Github上的部署设置中自定义域名设置了自己的域名上,如果想有自己的域名的话,可以搜索一下怎么购买和链接吧。
稍微对这篇博客做了一点点修改,删去了一些复杂或者没有必要的内容,考虑有空录制一期搭建过程的教程上传B站。现在的博客部署在coding上(香港节点域名不用备案),使用了腾讯的cdn加速,每个月的花费一块钱都不要,各方面的使用体验还是很不错的,有兴趣的可以自己研究一下。
本博客已迁移至以Wordpress搭建的动态网站了,内容也做了迁移。


Comments | NOTHING